Sony DPP-SV55 (and SV77, SV88) and Windows 7 —
So I decided to pull out my old Sony dye sublimation photo printer which I hadn’t used in some time, only to find Sony dropped support for it after Windows XP.
After hearing about other peoples success with old scanners under “XP Mode” I figured I would try with this old printer, and it worked like a champ, minus a few flaws of “XP Mode” itself. I will provide a basic overview of how to get it working below.
Installing “XP Mode” is out of scope for this tutorial, I am sure there’s several guides out there on this topic, this document will assume you have it installed and working already.
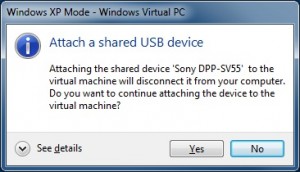
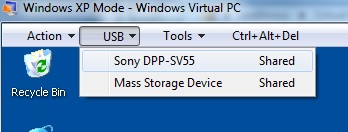
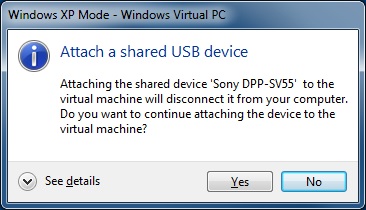
- Launch Virtual PC “Windows XP Mode”, wait for it to bring up an XP desktop window, with the printer plugged in and turned on go to the USB menu and click on the Sony DPP-SV__

- Then click YES to the “Attach” dialog
- Next install the Windows XP drivers for the printer in the XP Mode VM
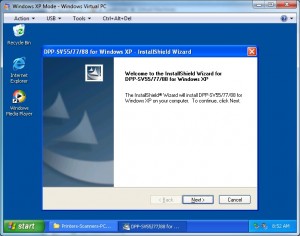 (this will fail if the printer is not attached following steps 1 & 2 because the installer checks for the presence of the printer).
 - Print! (from XP Mode) I chose to install an image viewing (and printing) package within XP Mode called IRFANVIEW to make things a little more seamless with the XP Mode integration, that way I do not have to bring up the “FULL XP mode Virtual PC desktop”, only the IRFANVIEW application via the Windows 7 start menu when I wish to print a photo.

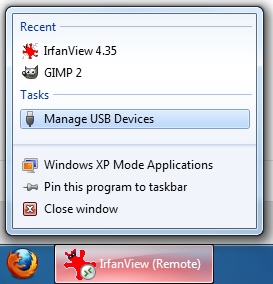
- Here is where the “flaws” of “XP Mode” come in to play. You must attach the printer under Manage USB Devices every single time you launch “XP Mode”, to do this when launching a lone Application, like IRFANVIEW, and the USB menu isn’t available in the tool bar like in desktop mode, just right click on its taskbar icon for your XP Mode application, while running, and you will find the “Manage USB Devices” option

On a side note, unrelated to the virtualization used to get this printer working, the Sony printers have always over-saturated reds in their prints, I have found that in IRFANVIEW under Image > Color Correction (SHIFT-G) if you bump the R down to about -20 or -30 and in SOME cases bump B up to about +10 you will get spot on prints that should match your screen, the program even allows you to “save these values” as defaults for future use, so in the future to print just SHIFT-G, ENTER, CTRL-P, ENTER to set the color correction and print in just a few seconds, also note this does NOT touch your original image’s color, just whats displayed and printed for this instance of the image in IRFANVIEW. These features are one of the main reasons I chose to use this IRFANVIEW as the default application for printing with my DPP-SV55.
Categorised as: Uncategorized
Leave a Reply